
Earlier this year I went to a talk at Science Oxford about getting into wildlife photography. I enjoyed the talk, from two extremely experienced (although essentially amateur) photographers, and picked up lots of great tips. However from the outset it was clear that, for them, wildlife photography was all about needing *really* expensive kit to get “the shot”.
Whilst I agree that a f2.8 300mm prime lens and a body that shoots 8fps certainly does help you get “the shot”, I couldn’t help think that it would have been better to have shown how you can still take good wildlife shots, and have great fun in the process with budget kit. Most of us can’t afford the best part of £10,000 on a body/lens combination!
So here’s my take on how to enjoy doing wildlife photography on a budget.
How cheap?
Whilst it’s possible to use a cheap compact, it’s important to have control over aperture (F-stop), shutter speed and ISO, and zoom. For the budget conscious, this means getting a digital “bridge” camera with zoom. Digital bridges cameras are a type of camera that sits between compacts and DSLRs that give you all the control but the image through the view finder is a digital image.
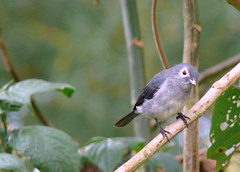
I’ve used a Panasonic FZ50 for a while and would highly recommend it. It has a 12x zoom and you can now get one for around £100 on eBay. It’s allowed me to take shots like this one:
But any camera with a decent zoom (x8 or more), and control over aperture, shutter speed, ISO and white balance will do. If I was buying a bridge now, I’d probably be looking at the highly rated Fuji HS10 for around £220 or so that gives an unbelievable x30.
The only major downside with these cameras is a slower focusing speed, so they’re best for relatively static subjects.
You might also want to consider teleconverters (which increase the zoom power by e.g. 1.4 or 1.7) for digital bridges. These cost between £30-£100 depending on make and condition.
If your budget is bigger, the next step would be a DSLR (£400-£1000 with kit lens), and a telephoto zoom around 300mm or more. Sigma or Tamron are cheaper than Nikon/Canon and are fine for the budget photographer. Telephotos only become really expensive as they become faster (ie below F4) so you can get one for £300 or so 2nd hand.
A tripod and head are also extremely handy, especially if you’re using a zoom with a teleconverter. Depends on make and model but around £200 or so would get a half decent one. I use a Manfrotto 190xb with a r222 joystick head which is a bit more expensive than that but I love the joystick action.
That’s enough about kit, let’s talk about taking shots.
Start simple
There’s not much point in trying for an epic bird-in-flight (BIF) shot to start off with.
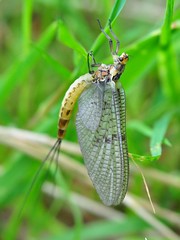
Static subjects, such as insects or other generally sessile creatures, can make great subjects. Sometimes the reduced focal range of compacts and bridge cameras means that you can get closer to the subject than with more expensive cameras.
Here’s a shot of a mayfly as an example, taken on a wander at lunchtime:
Another option is to shoot larger subjects, such as deer, geese, ducks. These don’t require hugh zoom simply because of their size.
Practicing on these simple subjects builds up your skills.
Think local
There is lots of wildlife closer to home.
A huge range of insects can be found in your garden, so hunt around. And use feeders to attract birds, placing the feeders close to windows so you don’t have to use zoom.
If you don’t have a garden, your local park can provide excellent hunting ground too. Most cities have some great locations. For example, in Oxford there are some amazing spots such as Port Meadow (wetland and geese), Oxford Canal (ducks, kingfisher, woodland birds) and the University Parks (bullfinches and goldfinches).
In London, Regents Park has herons and London Wetland has a wide range of wetland birds. Not forgetting Richmond Park’s deer and parakeets!
Use Google Maps (in satellite mode) to find green areas, and search for wildlife blogs in your area; for example I look at posts on the Oxon Bird log – not because I’m a birder, but because it references some great locations for spotting wildlife.
Get close
You can compensate for the lack of huge zoom by getting close to your subject.
This is, for me, where the fun and challenge of wildlife photography lies.
Here’s some tips to help:
- Habituate. Let the wildlife get used to you – for example by using feeders in your garden or drop feed in a park.
- Hides. Make use of hides at nature reserves (there’s information on them on on the web for most reserves, for example at Farmoor). These are usually placed in excellent locations for spotting wildlife and often have guides showing what you might expect to see.
- Use your car. Wildlife often doesn’t get spooked by cars as much as by people, so you can use your car as a mobile hide; you can rest the camera on the window to help steady it. Obviously you’ll need to be parked in a location that’s right for wildlife.
- Keep still and quiet. Most wildlife, especially birds, is disturbed by movement. Some of the best shots I’ve taken are when I find a nice spot, and then stand against a tree for 15mins or so. Animals don’t notice that you’re there and start to do their thing, making close-up photography possible. The shot I took of the White-Eyed Slaty Flycatcher above was done in this way, as was this pic:
Know thy subject
In order to get photos of some of the more difficult animals, it really helps to know your subject. Basic knowledge, such as habitat and the time of day when they are active, helps – e.g. early mornings on open grassland near cover is great for hares and deer.
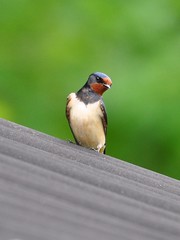
This can become more advanced, as you start to know the territory for a particular animal. For example it’s possible to get to know perches that a kingfisher favours, or areas of the river that have reeds for reed warblers. Recently, I spotted that swallows had nested in a barn on the way to work, so one lunch I was able to take this shot:
For birds, knowing their calls helps massively. This is a long and difficult learning process but very worthwhile (if you’re into that kind of thing!). I’ve found the RSPB bird guide invaluable as it has recordings of most of the common birds; for example I recently heard bird song on a walk and looked it up to find it was a reed warbler (which, incidentally, we think sounds like a slowed down skylark).
Framing the shot
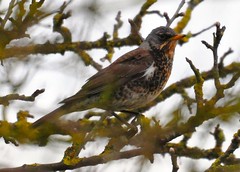
Good shots can be made to look great by getting the background of the shot just right. For example, in this photo of a fieldfare, even though the subject is in focus, the twiggy nature of the tree makes for a poor photo:
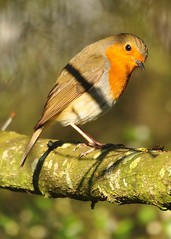
In this photo of a robin, the shot is spoilt by the shadow bar running across the bird:
Framing adds a level of complexity to the process, but is worth it as it doesn’t “cost” anything.
Here’s some ideas to improve your framing:
- choose the location first and then wait for the subject. This requires patience (!) and knowledge of the subject but can yield good results.
- Try using manual focus for moving subjects (i.e. you set the focus onto a spot that you know that they’re going to appear) – helps for moving targets like swallows.
- Use interesting angles, such as getting down low to water level to take photos of waterfowl such as ducks.
Summary
Hopefully this was a useful starter if you’re interested in wildlife photography. Please feel free to leave comments or get in touch.
All the photos used in this article were taken by Becs or Paul, and all our photos are on Flickr.
Paul.